> ## Documentation Index
> Fetch the complete documentation index at: https://citdhq.com/docs/llms.txt
> Use this file to discover all available pages before exploring further.
# AI Feed (GEO Blog)
> Generate fact-grounded, SEO-optimized articles that close your AI-search visibility gaps and publish them to your Shopify blog or custom site.
The AI Feed is available on paid plans (Starter and Growth).
**AI Feed** is Citd's Generative Engine Optimization (GEO) content engine. Instead of just showing where your visibility is weak, it generates articles designed to close the authority, relevance, and readiness gaps that stop you from being recommended by AI assistants like ChatGPT and Gemini. Articles can publish straight to your Shopify blog or any custom website.
 ## How AI Feed works
```mermaid theme={null}
flowchart LR
A[Intake and guardrails] --> B[Keyword and prompt mapping]
B --> C[Content calendar planned]
C --> D[Articles drafted by AI]
D --> E[You review and approve]
E --> F[Publish to Shopify or custom site]
F --> G[Impact measured]
```
Citd maps your goals, audiences, and brand rules to the tracking prompts and competitor gaps in your project, then plans a content calendar. Articles are drafted automatically and queued for your review. You approve, edit, or reject each one before anything goes live.
***
## Step 1 — Set up your intake
Before Citd can plan articles, you tell it what your brand stands for. The setup screen appears the first time you open AI Feed.
**Publishing settings**
Choose where articles will go:
* **Shopify blog** — Citd publishes directly to a blog in your connected store (e.g. `/blogs/citd-geo`). Requires Shopify connected.
* **Custom website** — Citd serves articles through a public feed your site reverse-proxies. See [Custom site reverse proxy setup](#custom-site-reverse-proxy-setup) below.
Choose your publishing mode:
* **Manual** — articles wait in the calendar for your approval before going live.
* **Auto** — Citd publishes approved articles automatically on their scheduled date.
**Intake fields**
| Field | What to enter |
| ---------------------- | ----------------------------------------------------------------------------------------- |
| **Marketing goals** | What you want articles to achieve (e.g. "rank for trail running gear comparison queries") |
| **Target audiences** | Who you are writing for (e.g. "trail runners planning their first 50K") |
| **Brand voice / tone** | How your brand sounds (e.g. "expert but approachable, never salesy") |
| **Allowed claims** | Facts and proof points you can always use |
| **Forbidden claims** | Statements to avoid |
| **Banned phrases** | Words or phrases that must never appear |
| **Proof points** | Specific stats, awards, or testimonials the AI can cite |
| **Salesiness** | A slider from editorial (1) to promotional (5) |
Citd pre-fills the intake fields from your project data. Review them and adjust before saving.
You can update the intake at any time from the setup card. Changes take effect on the next generation run.
***
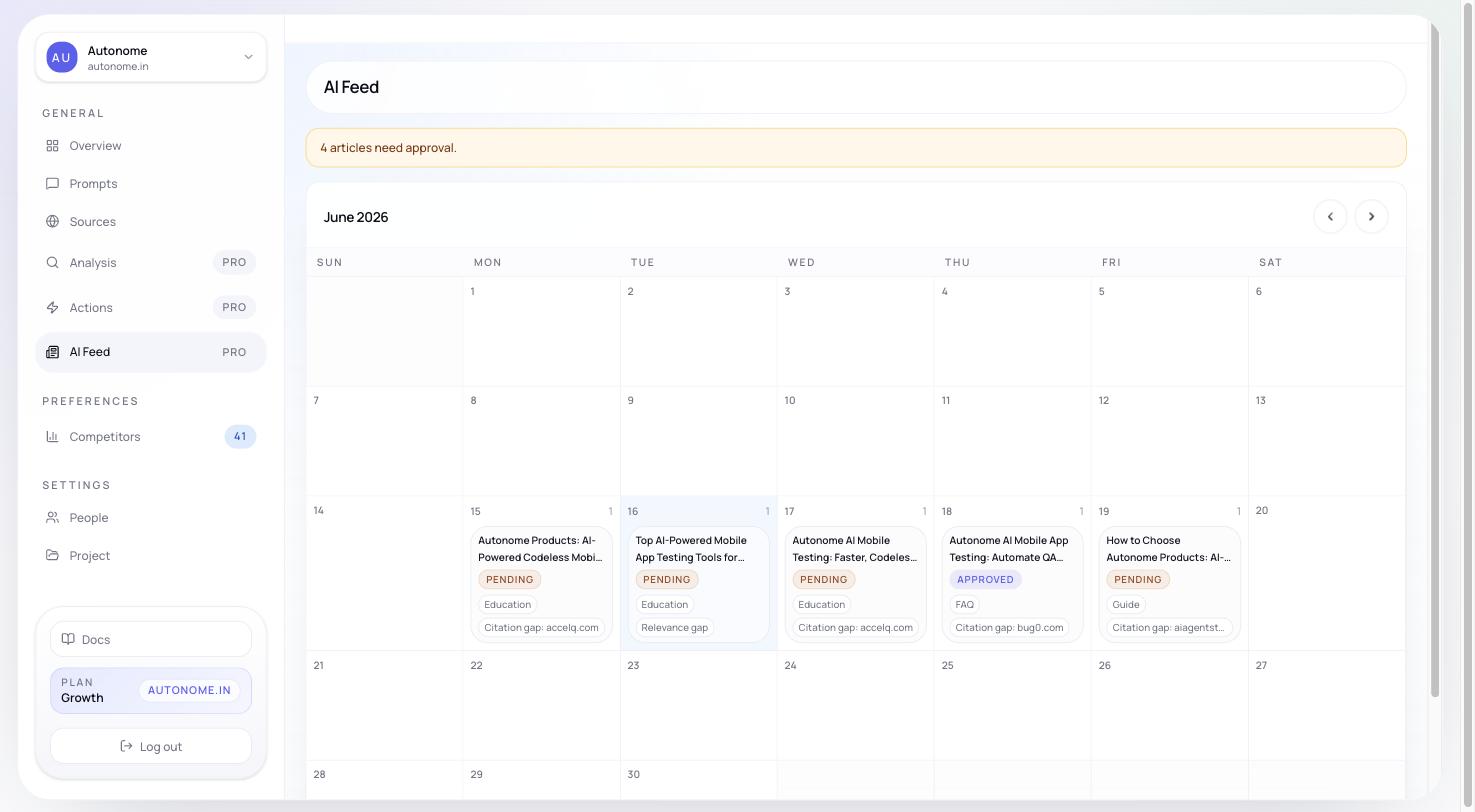
## Step 2 — Review the content calendar
Once setup is saved, Citd plans a calendar for the current and next month. Each article tile shows:
* **Title** — the planned article headline
* **Status** — Pending, Writing, Approved, Published, Rejected, or Failed
* **Scheduled date** — when it is planned to publish
* **Planning provenance** — why Citd picked this topic (e.g. "Losing to RidgeRun", "Relevance gap", "Citation gap")
Click any tile to open the article review page.
***
## Step 3 — Review and approve articles
The article review page is where you read the draft, check the sources, and decide whether to publish.
## How AI Feed works
```mermaid theme={null}
flowchart LR
A[Intake and guardrails] --> B[Keyword and prompt mapping]
B --> C[Content calendar planned]
C --> D[Articles drafted by AI]
D --> E[You review and approve]
E --> F[Publish to Shopify or custom site]
F --> G[Impact measured]
```
Citd maps your goals, audiences, and brand rules to the tracking prompts and competitor gaps in your project, then plans a content calendar. Articles are drafted automatically and queued for your review. You approve, edit, or reject each one before anything goes live.
***
## Step 1 — Set up your intake
Before Citd can plan articles, you tell it what your brand stands for. The setup screen appears the first time you open AI Feed.
**Publishing settings**
Choose where articles will go:
* **Shopify blog** — Citd publishes directly to a blog in your connected store (e.g. `/blogs/citd-geo`). Requires Shopify connected.
* **Custom website** — Citd serves articles through a public feed your site reverse-proxies. See [Custom site reverse proxy setup](#custom-site-reverse-proxy-setup) below.
Choose your publishing mode:
* **Manual** — articles wait in the calendar for your approval before going live.
* **Auto** — Citd publishes approved articles automatically on their scheduled date.
**Intake fields**
| Field | What to enter |
| ---------------------- | ----------------------------------------------------------------------------------------- |
| **Marketing goals** | What you want articles to achieve (e.g. "rank for trail running gear comparison queries") |
| **Target audiences** | Who you are writing for (e.g. "trail runners planning their first 50K") |
| **Brand voice / tone** | How your brand sounds (e.g. "expert but approachable, never salesy") |
| **Allowed claims** | Facts and proof points you can always use |
| **Forbidden claims** | Statements to avoid |
| **Banned phrases** | Words or phrases that must never appear |
| **Proof points** | Specific stats, awards, or testimonials the AI can cite |
| **Salesiness** | A slider from editorial (1) to promotional (5) |
Citd pre-fills the intake fields from your project data. Review them and adjust before saving.
You can update the intake at any time from the setup card. Changes take effect on the next generation run.
***
## Step 2 — Review the content calendar
Once setup is saved, Citd plans a calendar for the current and next month. Each article tile shows:
* **Title** — the planned article headline
* **Status** — Pending, Writing, Approved, Published, Rejected, or Failed
* **Scheduled date** — when it is planned to publish
* **Planning provenance** — why Citd picked this topic (e.g. "Losing to RidgeRun", "Relevance gap", "Citation gap")
Click any tile to open the article review page.
***
## Step 3 — Review and approve articles
The article review page is where you read the draft, check the sources, and decide whether to publish.
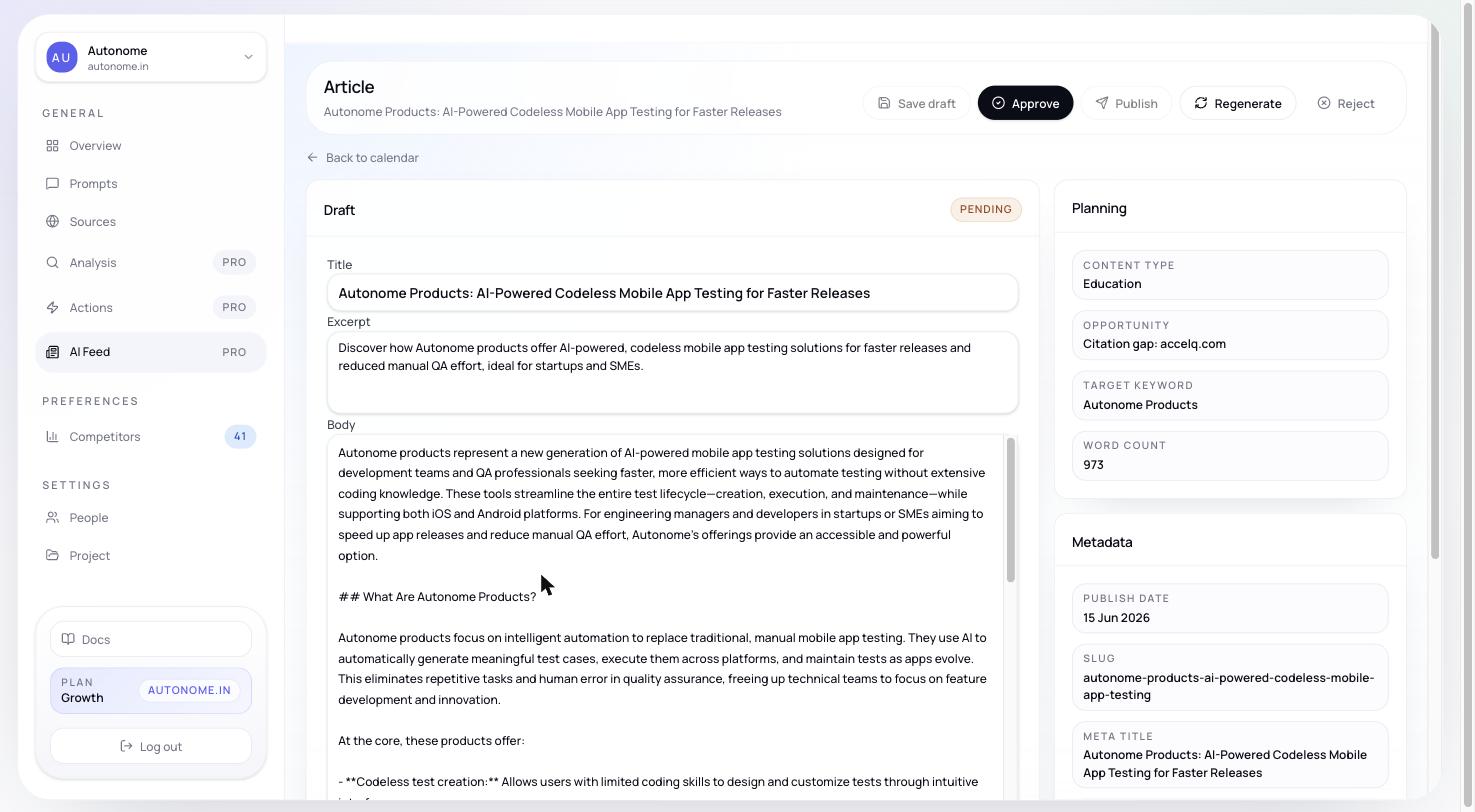 Each article includes:
* **Draft** — editable title, excerpt, and body. Save your edits before approving.
* **Planning** — content type (comparison, FAQ, guide, etc.), the opportunity it targets, the target keyword, and word count.
* **Metadata** — publish date, slug, SEO meta title and description.
* **Research sources** — the citations Citd used. Sources marked **Cited** appear in the article body.
**Article statuses**
| Status | Meaning |
| ------------- | ---------------------------------------------------------------------------------------------- |
| **Pending** | Generated and waiting for your review |
| **Writing** | AI is still drafting |
| **Approved** | You approved it; will publish on the scheduled date (Manual mode) or automatically (Auto mode) |
| **Published** | Live on your blog or custom site |
| **Rejected** | You chose not to publish it |
| **Failed** | Generation or publishing hit an error |
**Actions on the article page**
Change the title, excerpt, or body directly in the draft fields. Click **Save draft** to save your edits without approving.
Click **Approve** to mark the article ready for publishing. In Manual mode, it then waits for you to click **Publish**. In Auto mode, Citd publishes it automatically on the scheduled date.
In Manual mode, once an article is Approved, the **Publish** button becomes active. Click it to push the article to your Shopify blog or custom site immediately.
Not happy with the draft? Click **Regenerate**, add optional guidance (e.g. "focus more on waterproof materials"), and Citd rewrites the article. You can regenerate as many times as needed before approving.
Click **Reject** to skip an article. It stays in the calendar for reference but will not be published.
***
## Step 4 — Track post-publish impact
After an article publishes, Citd measures whether your visibility metrics moved. The impact result appears on the calendar tile and on the article's Planning card. Look for the **Post-publish impact** row.
***
## Next steps
See the authority, relevance, and readiness gaps AI Feed articles are designed to close.
AI Feed articles are planned against the same gaps as your Actions queue.
Connect Shopify to enable direct blog publishing.
Understand which external citations influence your authority score.
***
## Custom site reverse proxy setup
This section is for your developer or technical team. If you publish to a Shopify blog, you can skip it.
If your store runs on a custom frontend (Next.js, Astro, Remix, Nuxt, WordPress, or anything else), Citd serves articles through a public JSON/HTML feed. You host the blog at a subpath on your domain (e.g. `/blog`) and reverse-proxy requests to the Citd Public Feed API.
### How the feed works
Citd's AI Feed is a fully server-side rendered (SSR) HTML feed at:
```
https://citdhq.com/apex/api/v1/public/feed/YOUR_FEED_KEY
```
Your site proxies `/blog/*` to this URL, preserving the path suffix. When a browser requests `/blog`, it sends `Accept: text/html` and gets back a styled HTML page. API consumers get JSON.
### Setup verification requirements
Before Citd begins publishing articles to your custom site, click **Verify Setup** in the AI Feed settings. The verifier checks:
1. **Status code** — your blog index (e.g. `https://yourdomain.com/blog`) must return `200 OK`, not a redirect (`3xx`).
2. **SSR marker** — the returned HTML must contain `` or the string `citdhq-feed-origin` / `agentrank-feed-origin`.
3. **Canonical alignment** — the canonical URL tag in the HTML head must match your configured base URL.
4. **Health check** — `https://yourdomain.com/blog/_citdhq/health` must return `200 OK` with the `agentrank-feed-origin` marker in the JSON response.
5. **Sitemap domain** — `/blog/sitemap.xml` must list URLs on your domain (e.g. `yourdomain.com/blog/article`) and must **not** contain raw `citdhq.com` origin URLs.
Your proxy configuration **must** forward the `Accept` header. When a browser requests `/blog`, it sends `Accept: text/html`, telling Citd to return a fully styled SSR HTML page. Without this header, Citd falls back to returning JSON.
You must also forward the `X-Forwarded-Host` and `X-Forwarded-Proto` headers so that Citd can generate correct canonical and sitemap URLs matching your domain.
### Integration code snippets
```javascript theme={null}
/** @type {import('next').NextConfig} */
const nextConfig = {
async rewrites() {
const FEED_KEY = "YOUR_FEED_KEY";
return [
{
source: '/blog/:path*',
destination: `https://citdhq.com/apex/api/v1/public/feed/${FEED_KEY}/:path*`,
},
];
},
};
module.exports = nextConfig;
```
```nginx theme={null}
# Proxy the blog index
location = /blog {
proxy_pass https://citdhq.com/apex/api/v1/public/feed/YOUR_FEED_KEY;
proxy_set_header Host citdhq.com;
proxy_set_header X-Forwarded-Host $host;
proxy_set_header X-Forwarded-Proto $scheme;
proxy_ssl_server_name on;
}
# Proxy sitemap, rss, health check, and article pages
location /blog/ {
proxy_pass https://citdhq.com/apex/api/v1/public/feed/YOUR_FEED_KEY/;
proxy_set_header Host citdhq.com;
proxy_set_header X-Forwarded-Host $host;
proxy_set_header X-Forwarded-Proto $scheme;
proxy_ssl_server_name on;
}
```
```javascript theme={null}
export default {
async fetch(request, env) {
const url = new URL(request.url);
if (url.pathname === '/blog' || url.pathname.startsWith('/blog/')) {
const feedKey = "YOUR_FEED_KEY";
const suffix = url.pathname.replace(/^\/blog/, '');
const targetUrl = `https://citdhq.com/apex/api/v1/public/feed/${feedKey}${suffix}`;
const newHeaders = new Headers(request.headers);
newHeaders.set('X-Forwarded-Host', url.host);
newHeaders.set('X-Forwarded-Proto', url.protocol.replace(':', ''));
return fetch(targetUrl, {
method: request.method,
headers: newHeaders,
body: request.body
});
}
return fetch(request);
}
}
```
```javascript theme={null}
const express = require('express');
const proxy = require('express-http-proxy');
const app = express();
app.use('/blog', proxy('https://citdhq.com', {
proxyReqPathResolver: function (req) {
const feedKey = "YOUR_FEED_KEY";
const suffix = req.url === '/' ? '' : req.url;
return `/apex/api/v1/public/feed/${feedKey}${suffix}`;
},
proxyReqOptDecorator: function (proxyReqOpts, srcReq) {
proxyReqOpts.headers['X-Forwarded-Host'] = srcReq.headers.host;
proxyReqOpts.headers['X-Forwarded-Proto'] = srcReq.secure ? 'https' : 'http';
return proxyReqOpts;
}
}));
```
For standalone Shopify apps that integrate the AI Feed via a Shopify App Proxy (configured to point to `/apps/blog`):
```javascript theme={null}
app.get('/apps/blog', async (req, res) => {
const feedKey = "YOUR_FEED_KEY";
const acceptHeader = req.headers.accept || '';
const suffix = req.url.replace(/^\/apps\/blog/, '');
try {
const response = await fetch(`https://citdhq.com/apex/api/v1/public/feed/${feedKey}${suffix}`, {
headers: {
'Accept': acceptHeader,
'X-Forwarded-Host': req.headers['x-forwarded-host'] || req.headers.host,
'X-Forwarded-Proto': 'https'
}
});
res.status(response.status);
const contentType = response.headers.get('content-type');
if (contentType) {
res.setHeader('content-type', contentType);
}
const body = await response.text();
res.send(body);
} catch (err) {
res.status(500).send("AI Feed proxy connection error");
}
});
```
### AI prompt for other stacks
To implement the proxy in a framework not listed above, paste the following into ChatGPT or Claude:
```text theme={null}
You are an expert web developer. I need to set up a reverse proxy on my website to route all traffic from `/blog` to an external AI-generated blog feed hosted at `https://citdhq.com/apex/api/v1/public/feed/YOUR_FEED_KEY`.
The proxy must meet the following requirements:
1. Use a wildcard or prefix rewrite to preserve and pass the exact path suffix from `/blog/*` to the destination URL.
2. Forward the `Accept` headers (so that `Accept: text/html` requests trigger server-side HTML rendering at the destination, while other requests retrieve JSON).
3. Set `X-Forwarded-Host` and `X-Forwarded-Proto` headers to match my site's hostname and protocol, ensuring the remote server generates canonical links correctly.
4. Ensure it returns a 200 response directly (not a 3xx redirect).
Please write the complete, clean, and production-ready code to implement this in [INSERT YOUR TECH STACK / FRAMEWORK HERE].
```
Each article includes:
* **Draft** — editable title, excerpt, and body. Save your edits before approving.
* **Planning** — content type (comparison, FAQ, guide, etc.), the opportunity it targets, the target keyword, and word count.
* **Metadata** — publish date, slug, SEO meta title and description.
* **Research sources** — the citations Citd used. Sources marked **Cited** appear in the article body.
**Article statuses**
| Status | Meaning |
| ------------- | ---------------------------------------------------------------------------------------------- |
| **Pending** | Generated and waiting for your review |
| **Writing** | AI is still drafting |
| **Approved** | You approved it; will publish on the scheduled date (Manual mode) or automatically (Auto mode) |
| **Published** | Live on your blog or custom site |
| **Rejected** | You chose not to publish it |
| **Failed** | Generation or publishing hit an error |
**Actions on the article page**
Change the title, excerpt, or body directly in the draft fields. Click **Save draft** to save your edits without approving.
Click **Approve** to mark the article ready for publishing. In Manual mode, it then waits for you to click **Publish**. In Auto mode, Citd publishes it automatically on the scheduled date.
In Manual mode, once an article is Approved, the **Publish** button becomes active. Click it to push the article to your Shopify blog or custom site immediately.
Not happy with the draft? Click **Regenerate**, add optional guidance (e.g. "focus more on waterproof materials"), and Citd rewrites the article. You can regenerate as many times as needed before approving.
Click **Reject** to skip an article. It stays in the calendar for reference but will not be published.
***
## Step 4 — Track post-publish impact
After an article publishes, Citd measures whether your visibility metrics moved. The impact result appears on the calendar tile and on the article's Planning card. Look for the **Post-publish impact** row.
***
## Next steps
See the authority, relevance, and readiness gaps AI Feed articles are designed to close.
AI Feed articles are planned against the same gaps as your Actions queue.
Connect Shopify to enable direct blog publishing.
Understand which external citations influence your authority score.
***
## Custom site reverse proxy setup
This section is for your developer or technical team. If you publish to a Shopify blog, you can skip it.
If your store runs on a custom frontend (Next.js, Astro, Remix, Nuxt, WordPress, or anything else), Citd serves articles through a public JSON/HTML feed. You host the blog at a subpath on your domain (e.g. `/blog`) and reverse-proxy requests to the Citd Public Feed API.
### How the feed works
Citd's AI Feed is a fully server-side rendered (SSR) HTML feed at:
```
https://citdhq.com/apex/api/v1/public/feed/YOUR_FEED_KEY
```
Your site proxies `/blog/*` to this URL, preserving the path suffix. When a browser requests `/blog`, it sends `Accept: text/html` and gets back a styled HTML page. API consumers get JSON.
### Setup verification requirements
Before Citd begins publishing articles to your custom site, click **Verify Setup** in the AI Feed settings. The verifier checks:
1. **Status code** — your blog index (e.g. `https://yourdomain.com/blog`) must return `200 OK`, not a redirect (`3xx`).
2. **SSR marker** — the returned HTML must contain `` or the string `citdhq-feed-origin` / `agentrank-feed-origin`.
3. **Canonical alignment** — the canonical URL tag in the HTML head must match your configured base URL.
4. **Health check** — `https://yourdomain.com/blog/_citdhq/health` must return `200 OK` with the `agentrank-feed-origin` marker in the JSON response.
5. **Sitemap domain** — `/blog/sitemap.xml` must list URLs on your domain (e.g. `yourdomain.com/blog/article`) and must **not** contain raw `citdhq.com` origin URLs.
Your proxy configuration **must** forward the `Accept` header. When a browser requests `/blog`, it sends `Accept: text/html`, telling Citd to return a fully styled SSR HTML page. Without this header, Citd falls back to returning JSON.
You must also forward the `X-Forwarded-Host` and `X-Forwarded-Proto` headers so that Citd can generate correct canonical and sitemap URLs matching your domain.
### Integration code snippets
```javascript theme={null}
/** @type {import('next').NextConfig} */
const nextConfig = {
async rewrites() {
const FEED_KEY = "YOUR_FEED_KEY";
return [
{
source: '/blog/:path*',
destination: `https://citdhq.com/apex/api/v1/public/feed/${FEED_KEY}/:path*`,
},
];
},
};
module.exports = nextConfig;
```
```nginx theme={null}
# Proxy the blog index
location = /blog {
proxy_pass https://citdhq.com/apex/api/v1/public/feed/YOUR_FEED_KEY;
proxy_set_header Host citdhq.com;
proxy_set_header X-Forwarded-Host $host;
proxy_set_header X-Forwarded-Proto $scheme;
proxy_ssl_server_name on;
}
# Proxy sitemap, rss, health check, and article pages
location /blog/ {
proxy_pass https://citdhq.com/apex/api/v1/public/feed/YOUR_FEED_KEY/;
proxy_set_header Host citdhq.com;
proxy_set_header X-Forwarded-Host $host;
proxy_set_header X-Forwarded-Proto $scheme;
proxy_ssl_server_name on;
}
```
```javascript theme={null}
export default {
async fetch(request, env) {
const url = new URL(request.url);
if (url.pathname === '/blog' || url.pathname.startsWith('/blog/')) {
const feedKey = "YOUR_FEED_KEY";
const suffix = url.pathname.replace(/^\/blog/, '');
const targetUrl = `https://citdhq.com/apex/api/v1/public/feed/${feedKey}${suffix}`;
const newHeaders = new Headers(request.headers);
newHeaders.set('X-Forwarded-Host', url.host);
newHeaders.set('X-Forwarded-Proto', url.protocol.replace(':', ''));
return fetch(targetUrl, {
method: request.method,
headers: newHeaders,
body: request.body
});
}
return fetch(request);
}
}
```
```javascript theme={null}
const express = require('express');
const proxy = require('express-http-proxy');
const app = express();
app.use('/blog', proxy('https://citdhq.com', {
proxyReqPathResolver: function (req) {
const feedKey = "YOUR_FEED_KEY";
const suffix = req.url === '/' ? '' : req.url;
return `/apex/api/v1/public/feed/${feedKey}${suffix}`;
},
proxyReqOptDecorator: function (proxyReqOpts, srcReq) {
proxyReqOpts.headers['X-Forwarded-Host'] = srcReq.headers.host;
proxyReqOpts.headers['X-Forwarded-Proto'] = srcReq.secure ? 'https' : 'http';
return proxyReqOpts;
}
}));
```
For standalone Shopify apps that integrate the AI Feed via a Shopify App Proxy (configured to point to `/apps/blog`):
```javascript theme={null}
app.get('/apps/blog', async (req, res) => {
const feedKey = "YOUR_FEED_KEY";
const acceptHeader = req.headers.accept || '';
const suffix = req.url.replace(/^\/apps\/blog/, '');
try {
const response = await fetch(`https://citdhq.com/apex/api/v1/public/feed/${feedKey}${suffix}`, {
headers: {
'Accept': acceptHeader,
'X-Forwarded-Host': req.headers['x-forwarded-host'] || req.headers.host,
'X-Forwarded-Proto': 'https'
}
});
res.status(response.status);
const contentType = response.headers.get('content-type');
if (contentType) {
res.setHeader('content-type', contentType);
}
const body = await response.text();
res.send(body);
} catch (err) {
res.status(500).send("AI Feed proxy connection error");
}
});
```
### AI prompt for other stacks
To implement the proxy in a framework not listed above, paste the following into ChatGPT or Claude:
```text theme={null}
You are an expert web developer. I need to set up a reverse proxy on my website to route all traffic from `/blog` to an external AI-generated blog feed hosted at `https://citdhq.com/apex/api/v1/public/feed/YOUR_FEED_KEY`.
The proxy must meet the following requirements:
1. Use a wildcard or prefix rewrite to preserve and pass the exact path suffix from `/blog/*` to the destination URL.
2. Forward the `Accept` headers (so that `Accept: text/html` requests trigger server-side HTML rendering at the destination, while other requests retrieve JSON).
3. Set `X-Forwarded-Host` and `X-Forwarded-Proto` headers to match my site's hostname and protocol, ensuring the remote server generates canonical links correctly.
4. Ensure it returns a 200 response directly (not a 3xx redirect).
Please write the complete, clean, and production-ready code to implement this in [INSERT YOUR TECH STACK / FRAMEWORK HERE].
```